Thursday, November 17, 2016

North & West Course Closure 11/25/16


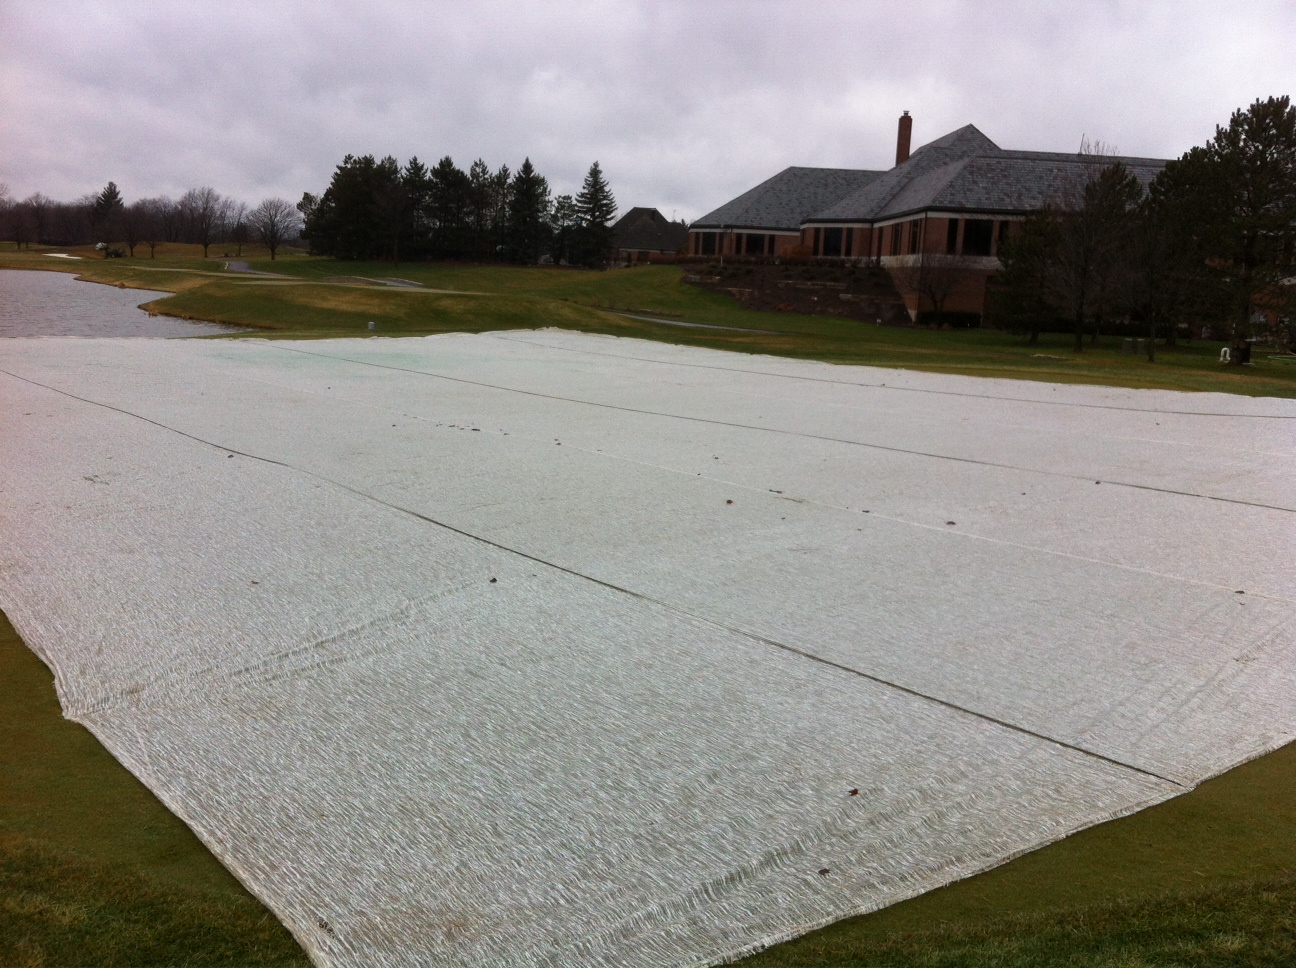
Weather is changing and it's that time of year. Winter greens covers will begin to be installed on the North and West nines on Friday, November 25th. Starting Friday,  the North and West nines will be closed for the 2016 season. The South course will remain open until further notice.

Thursday, November 10, 2016

Fall Projects


Weather is certainly changing and we are transitioning from daily maintenance to tackling some projects on the course. Below are a few photos of current projects. Next week we will begin drainage work in select areas.


This picture shows where an old cart path was on 8 South. After construction this path was no longer in use. Using our mini-excavator, the old asphalt was removed and new soil was graded into this area.

The old cart path with new soil graded in and close to being ready for seed. This area will be seeded in the spring of 2017.


Patio pavers underneath the lightning shelters were in poor shape. 

Pavers were removed. As can be seen in this photo, a sufficient base was not used in the past to keep the pavers from moving. 

A new stone base was installed and compacted and the pavers were laid back in place. Finish grading and sod is the next step to completing this area.


Friday, September 16, 2016

Fine Fescue "Native" Areas

Fine fescue natives are being treated for weeds today as part of our fall maintenance program. Cutting down these areas to normal rough height will begin on September 30th which also helps control unwanted weeds as well as dead plant material.

Wednesday, July 27, 2016

Bridge Repair

Course maintenance in July generally includes watering turf, fertilizing, mowing, and other routine items. Repairing a bridge was not planned, and certainly not ideal, but due to our staff size and talented individuals working at WCCC, we were able to handle this project in-house.  The culvert pipes under the bridge suffered years of abuse from storm water passing through them. Three concrete drain culverts are connected together underneath the surface to move the water, but one came disconnected causing the cart path to begin sinking around it. Using our mini-x, our staff dug out the old cart path, removed the soil from around the disconnected culvert, re-packed new stone around it for stability, and completed a new bridge installation. Below are a few pictures from the process.


Cart path sinking around disconnected culvert

Space can be seen here where the connection should be tight

Repaired culvert

Stone was compacted all around the pipe for stability

New "bridge" was framed and leveled with sand

Wire mesh installed for strength and concrete being poured

Concrete finished and rebar set for block installation

Block being installed on both sides

Stone veneer was custom fit piece by piece 
Thin veneer being applied to the sides


Cap pieces added as the final touch

New path poured to align properly to the new bridge

Thursday, April 28, 2016

Lower Patio Project

With a very talented staff and supportive membership we have been able to accomplish great things over the last few years both on the golf course and on the surrounding grounds. Recently, Assistant Superintendent Michael Brown was put in charge of a patio building project on the back club lawn. Michael's background in hardscaping lined up perfectly with the new patio build that was proposed.  After detailing the scope of the project and budget with materials and labor factored in, it was determined that by doing this project with in-house staff vs. contracting it out, the club was able to save over $20,000. Michael did an outstanding job managing the project and the final product is beautiful.  We hope members and their guests enjoy the new patio this year and for many more years to come. Below is an explanation of the process involved with building a patio of this scope, and the detail that goes into it. 

The first step after identifying the shape and size of the patio was to identify the location where it would be built. Using a stake in the center as the proposed fire pit spot, measurements were made and irrigation flags were used to outline the edges of the future patio. Seeing it set up in this fashion allowed everyone to get a feel of the size before any product was ordered.
Four different quotes were collected for our bulk patio supplies order. When the order was placed, all materials were delivered at once to minimize delivery costs.

Once the materials were on site, excavation began using our mini-excavator. To blend the patio and wall into the hill, almost three feet of soil had to be excavated on the back side where the seating wall would be placed.

Mother nature didn't always cooperate and frequent rain during excavation made for a muddy project. 

When all the excavation was complete, the patio shape was re-marked and flagged.  Small tweaks were made at this time to ensure the area was properly graded.

6-8" of stone base was added above the soil grade and compacted to provide a firm base for the patio. Doing this minimizes the risk that the patio blocks will ever move.

Construction first began with the seating wall that wraps around the back of the patio including the steps. This involved custom cutting some blocks to make the shape needed for our build.

Utilizing the wall blocks, steps were built for entering and exiting the patio. It was extremely important at this time to ensure the blocks were set at the proper grade using a laser transit and levels.

Once a level, compacted grade was established, the wall went up fairly quickly. All wall blocks are secured together using construction adhesive.

Wall blocks were placed all around the exterior of the patio to allow for less carrying of the heavy block to set them in place. 

Drainage tile was installed behind the wall to move water away from the patio. Geotextile fabric was also used against the back of the seating wall to prevent the movement of soil through the cracks.

Geotextile fabric installed along the back of the wall
2" of slag sand on top of the compacted stone is used to create a very level surface for the pavers. To get the sand level, pipes are inset and the top of the pipe is set 2 inches below the finish patio grade. A flat board is dragged between the pipes, flattening the sand at the intended grade. When this is complete, pavers can start being set into place. 

Before pavers could be laid across the whole patio, a contractor was hired to run the main gas line and electric service into place.


The patio build didn't come without it's problems! Weather changed and everything froze. This slowed down the build but in the end did not negatively impact it. 

The patio paver process moved quickly when the staff helping was trained to take over the leveling process.


The fire pit was built into the patio over top of the previously placed gas line

Step coping was set in place during the installation of LED lights

Here the patio surface has been completed. After all the patio pavers were laid in place, polymetric sand was broomed into all the joints and a plate compacter was used to work the sand in. This process locks the pavers in place. After the sand broomed in and compacted, water was sprayed on the surface to activate the glue in the sand.


LED lights highlighting the new seating wall and steps

Plumbing of the fire pit was also done by in house staff


Finished patio! Great job by all the staff! 


Thursday, March 17, 2016

2014 vs. 2016

The winter of 2015/2016 was much better for turf health and we're set up to have a nice start to the golfing season this year. We do not have an official opening day set at this time but it's not far away. The grounds department staff have been busy preparing the course for opening and we're excited to welcome everyone back soon. 

Below are a few comparison photos from 2014 to now. I'm very thankful we had a nice winter and look forward to the season ahead!


3 North Green

6 North Green

Thursday, March 10, 2016

Current Course Conditions

Cover removed from 7 North green on: 3/8/16
I'm very happy to say that the golf course made it through winter well and all turf surfaces are healthy.  Frost remains in the ground and covers are still in place on the North and West greens. Currently the course is very wet with more rain on the way.  At this time we do not have a date picked out for opening the courses but we will be posting it here when it's decided.  We look forward to having everyone back at the club for the 2016 season!

Thursday, February 18, 2016

Aerial Lift Used For In-House Tree Pruning

Over the last few weeks the grounds staff has been very busy with in-house tree pruning.  With the use of an aerial lift capable of raising over 50 feet, trees are being pruned for tree and turf health, aesthetics, safety, and course playability.  Our main efforts have been focused on removing low hanging limbs that could impact golfers or our turf mowing equipment as well as removing any dead material that could come down in summer storms.  While there, we are also "shaping" trees by removing limbs that distract from the beauty of the overall tree. Removing low limbs from mature trees and thinning canopies also allows from increased air movement and sunlight.  Both of these things benefit turf health surrounding the trees. 

Our staff has averaged trimming 20+ trees each day and we plan to continue this work for the next two weeks depending on weather. Below are some photos of the tree work being completed. Hired out, a month of tree trimming such as this could cost over $35,000!


Assistant Chris Notestine - not scared of heights!

Assistant Michael Brown trimming a specimen tree on 5 South!

Left side of 2 West getting cleaned up

Before and After: 5 South fescue just passed the pond
An aerial lift making tree pruning safe and efficient